ARR Integration
Quick access to Sonarr, Radarr, and Bazarr from Jellyfin, plus calendar and download monitoring.
Note
*arr links are only visible to admin users
Other features are visible to all users.
Warning
Security Considerations:
- API Keys are stored securely on server
- Network Access - Ensure *arr instances are secure
- HTTPS - Use HTTPS for remote access
Features
The ARR integration provides convenient links to your Sonarr, Radarr, and Bazarr instances directly from Jellyfin item pages. Additionally, it can display *arr tags as clickable links and provide calendar and download monitoring pages.
- Quick Links - Jump to Sonarr, Radarr, Bazarr pages for any item
- Tag Links - Display *arr tags as clickable links with filtering
- Calendar View - Upcoming releases from Sonarr/Radarr
- Requests Page - Monitor download queue and status
- Admin Only - Links only visible to administrators
ARR Links
Setup
- Go to Dashboard → Plugins → Jellyfin Enhanced
- Navigate to *arr Settings tab
- Check "Enable *arr Links"
- Add one or more Sonarr and/or Radarr instances (see Multi-Instance Support below)
- Optionally add a Bazarr URL for subtitle management links
- Optional: Check "Show *arr Links as Text" for text links instead of icons
- Click Save
Multi-Instance Support
You can configure multiple Sonarr instances and multiple Radarr instances — useful for separate libraries (e.g., TV vs Anime, HD vs 4K).
Each instance has:
| Field | Description |
|---|---|
| Name | Display name shown in dropdowns (e.g., "TV Shows", "Anime", "4K Movies") |
| URL | Base URL of the instance (e.g., http://192.168.1.100:8989) |
| API Key | API key for authenticating with the instance |
| URL Mappings | Optional per-instance URL remapping (see below) |
| Enabled | Toggle to disable an instance without deleting it |
Adding instances:
- Open plugin settings → *arr Settings tab
- Click "Add Sonarr Instance" or "Add Radarr Instance"
- Fill in Name, URL, and API Key
- Click Save
Disabling an instance:
Toggle the Enabled switch off to temporarily disable an instance (e.g., during maintenance). The instance remains in config with its URL and API key intact — re-enable it at any time without re-entering credentials.
How links behave with multiple instances:
- Single matching instance — renders as a plain icon link (no badge clutter). Enable "Show status badge for single-instance links" to always show the status border and episode/file count.
- Multiple matching instances — the link becomes a dropdown button. Click it to see each instance with: - A colour-coded status dot (green = complete, amber = partial, grey = missing) - Episode count or download status - File size on disk
Calendar and Requests pages fan out across all enabled instances automatically.
URL Mappings
Map internal and external URLs for different network contexts. Mappings can be set globally (legacy fields) or per-instance.
Format:
Example:
Use Case: Different URLs for local network vs remote access.
Legacy Single-Instance Fields
The original SonarrUrl, SonarrApiKey, RadarrUrl, and RadarrApiKey fields are preserved for downgrade safety. If no instances are configured in the new multi-instance list, the plugin automatically falls back to these legacy fields so existing setups continue working without any migration step.
Note
After adding instances via the new UI, the legacy fields are no longer used for arr links. They remain in config and are not deleted, so downgrading to an older plugin version restores the previous single-instance behaviour.
Usage
On Item Detail Pages:
- Open any movie or TV show
- Look for *arr link icons in the external links section
- Click to open the item in the respective *arr application, or click the dropdown to choose an instance
Visibility:
- Only visible to administrators
- Automatically detects item type (movie/TV)
- Shows relevant links only (Sonarr for TV, Radarr for movies)
ARR Tags
Display synced *arr tags as clickable links on item detail pages.
Setup
Prerequisites:
- Sonarr and/or Radarr configured
- API keys for Sonarr and Radarr
Configuration:
- Go to Dashboard → Plugins → Jellyfin Enhanced
- Navigate to *arr Settings tab
- Check "Enable *arr Tags Sync"
- Enter Sonarr API Key
- Enter Radarr API Key
- Configure tag settings (see below)
- Click Save
Tag Settings
Tag Prefix:
- Default:
JE Arr Tag: - Prefix added to synced tags
- Helps identify plugin-managed tags
Clear Old Tags:
- Remove old plugin-managed tags before syncing
- Keeps tags clean and up-to-date
- Recommended: Enabled
Show Tags as Links:
- Display tags as clickable links on item pages
- Click to view all items with that tag
- Recommended: Enabled
Tag Filtering
Links Filter (Show Only):
- Comma-separated list of tag names to show
- Only matching tags displayed as links
- Leave empty to show all tags
Example:
Links Hide Filter:
- Comma-separated list of tag names to hide
- Matching tags not displayed as links
- Overrides show filter
Example:
Sync Filter:
- Comma-separated list of tag names to sync
- Only matching tags synced from *arr
- Leave empty to sync all tags
Custom Styling
Customize tag link appearance with CSS.
Example - Rename Tag:
/* Hide original label */
.itemExternalLinks a.arr-tag-link[data-tag-name="1 - n00bcodr"] .arr-tag-link-text {
  display: none !important;
}

/* Add custom label */
.itemExternalLinks a.arr-tag-link[data-tag-name="1 - n00bcodr"]::after {
  content: " N00bCodr";
}
Example - Hide Specific Tag:
Example - Service Colors:
See README for more CSS examples.
Calendar Page
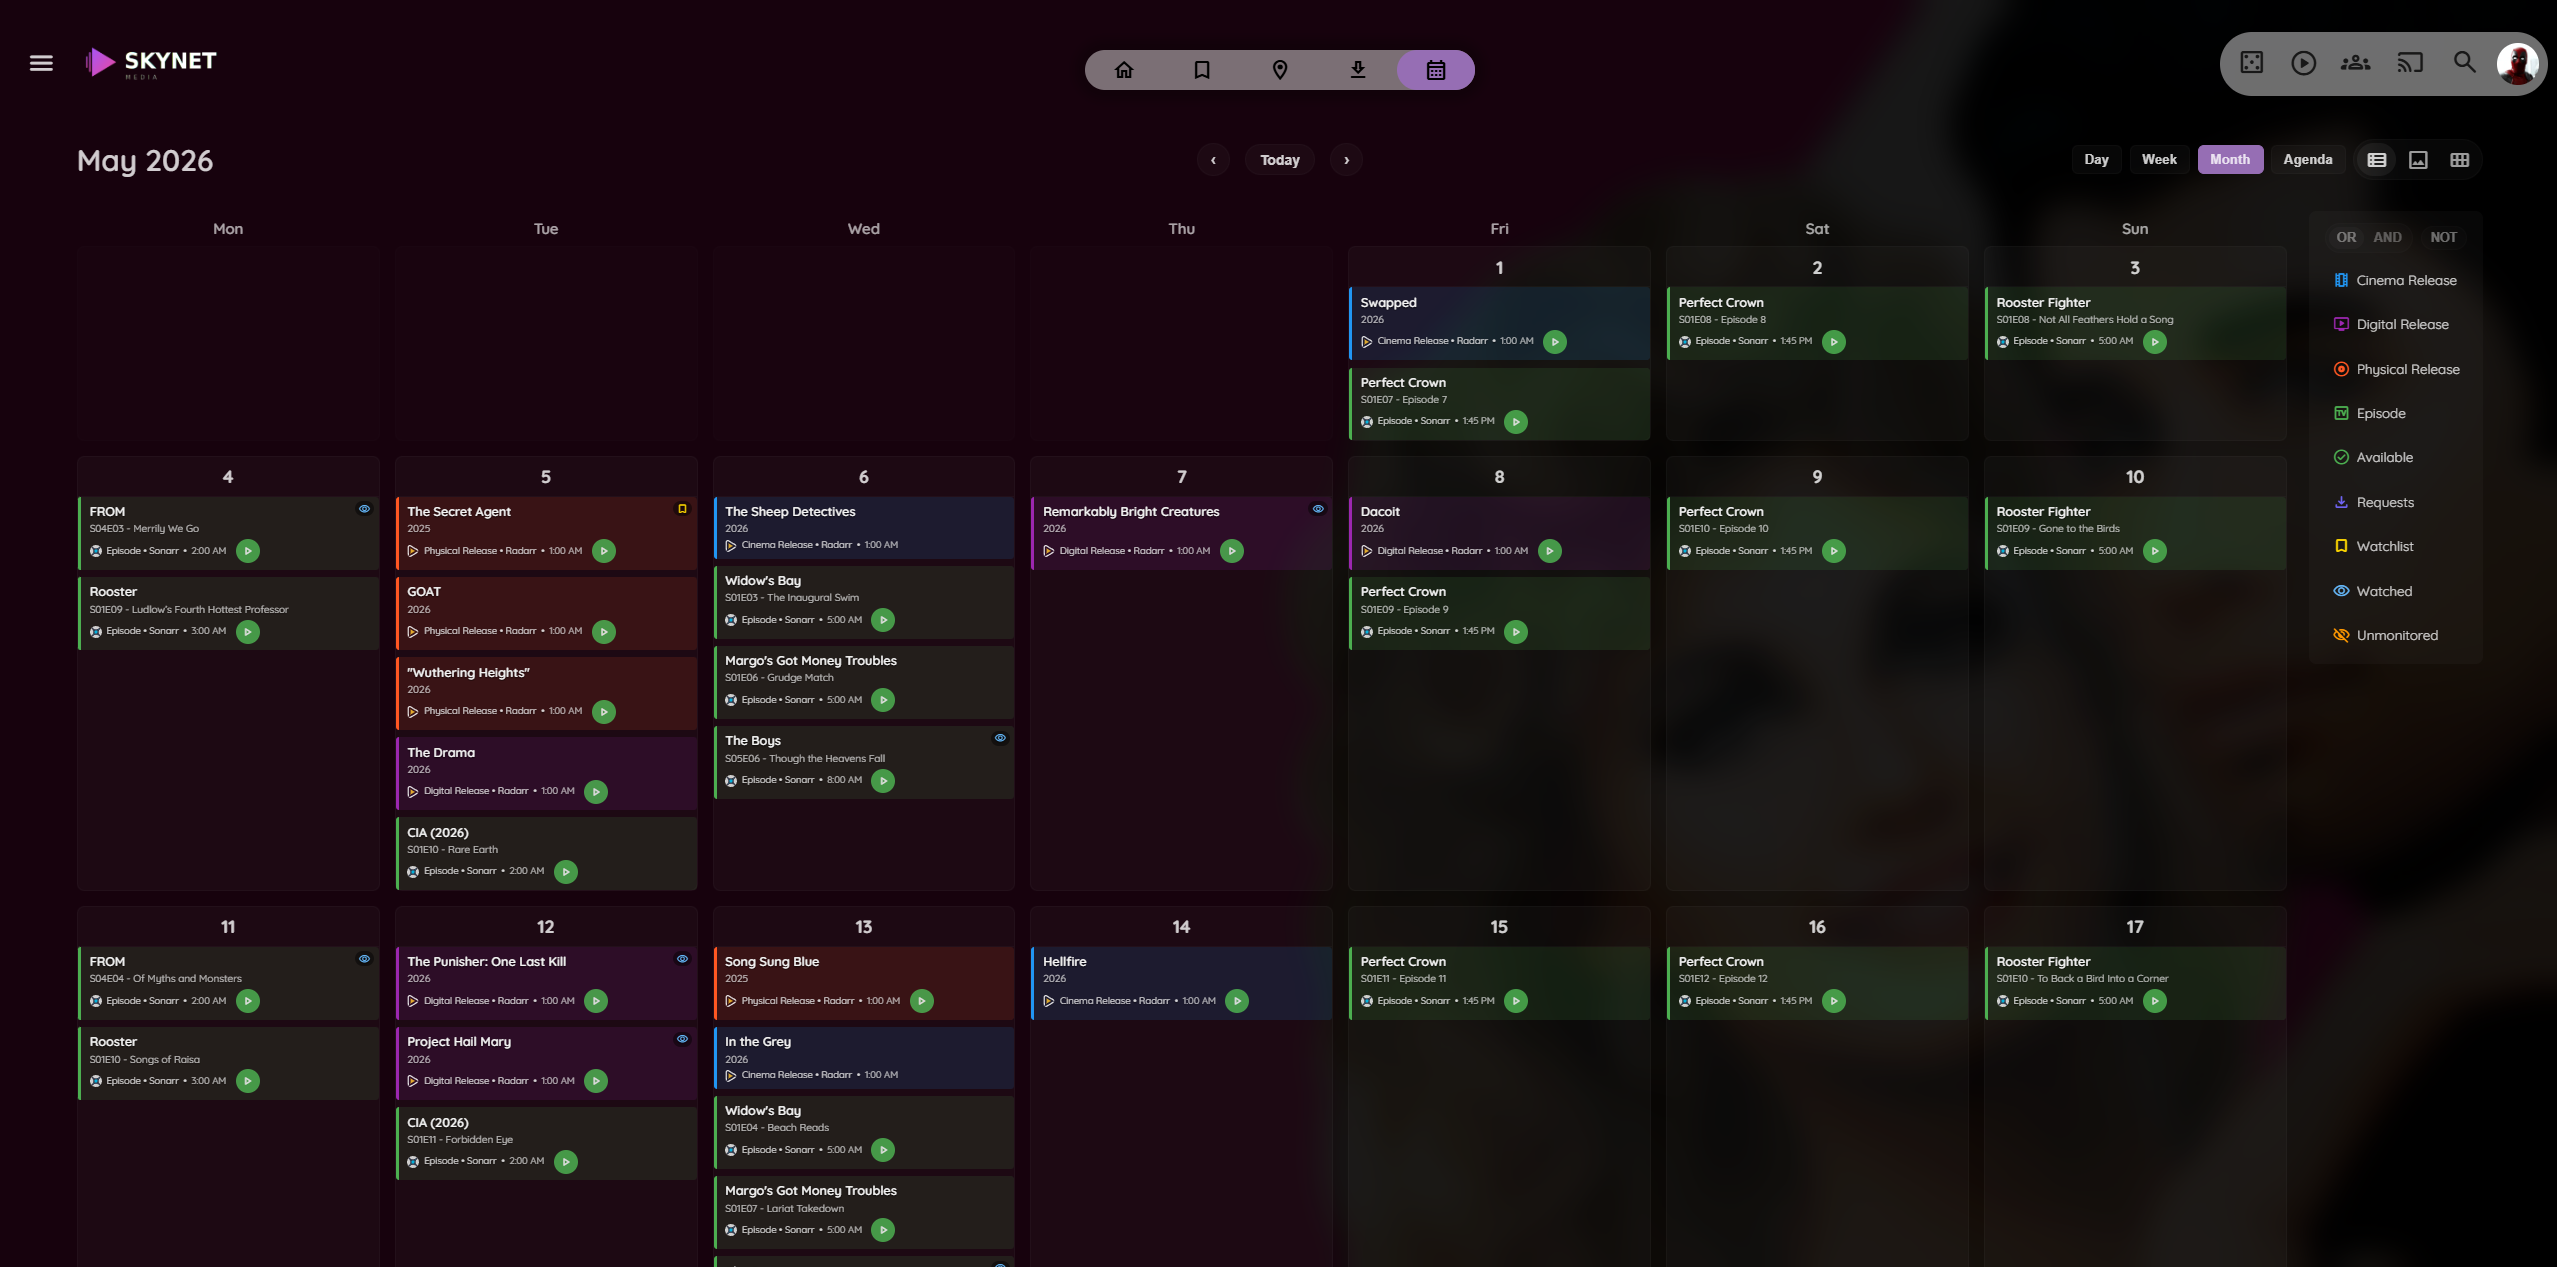
View upcoming releases from Sonarr and Radarr in a calendar interface.
Setup
- Go to Dashboard → Plugins → Jellyfin Enhanced
- Navigate to *arr Settings tab
- Check "Enable Calendar Page"
- Choose integration method:
- Use Plugin Pages - Adds sidebar link (requires Plugin Pages plugin)
- Use Custom Tabs - Adds custom tab (requires Custom Tabs plugin)
- Configure calendar settings (see below)
- Click Save
- Restart Jellyfin if using Plugin Pages
Calendar Settings
First Day of Week:
- Monday (default)
- Sunday
Time Format:
5pm/5:30pm- 12-hour format17:00/17:30- 24-hour format
Highlight Favorites:
- Highlight favorite shows/movies in calendar
- Requires favorites set in Jellyfin
Highlight Watched Series:
- Highlight series you're currently watching
- Based on watch history
Requests Filter:
- Filter calendar to show only requested items
- Helps track upcoming releases you've requested
- Toggle on/off as needed
Usage
Access Calendar:
- Click "Calendar" in sidebar (Plugin Pages)
- Navigate to custom tab (Custom Tabs)
- Direct URL:
/web/index.html#!/jellyfinenhanced/calendar
Features:
- Month, week, and agenda views
- Color-coded by series/movie
- Click event to view details
- Filter by Sonarr/Radarr
- Search functionality
Downloads Page

Monitor active downloads from Sonarr and Radarr in a dedicated page.
Features
- Active download queue with progress bars and ETA
- Quality and file size information
- Auto-refresh with configurable poll interval
- Filter and search
Setup
- Go to Dashboard → Plugins → Jellyfin Enhanced
- Navigate to *arr Settings tab
- Check "Enable Requests Page" (under "Requests Page (Downloads)")
- Choose integration method (Plugin Pages or Custom Tabs)
- Click Save and restart Jellyfin if using Plugin Pages
Direct URL: /web/index.html#!/jellyfinenhanced/downloads
Note
This page shows only arr download queue entries. Seerr media requests and issues are shown on a separate Requests page configured in the Seerr Settings* tab.